Chapter 1 Power-on Self-starting
1. Press the "DEL" key to enter the BIOS, as shown in the following figure:
2. Choose Advanced---->ACPI Settings, as shown in the following figure: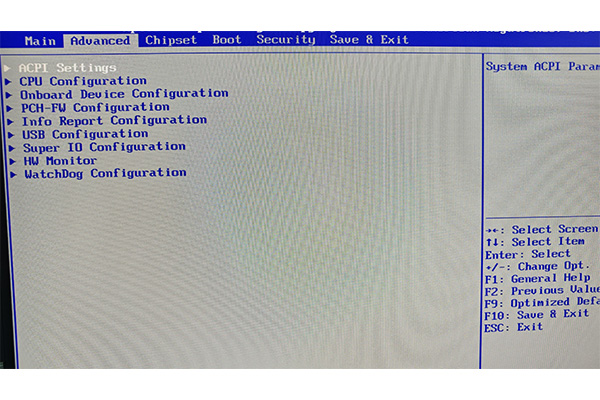
3. Press "Enter" to enter the option, and find "Power Loss State-- >Power on", as shown in the following picture: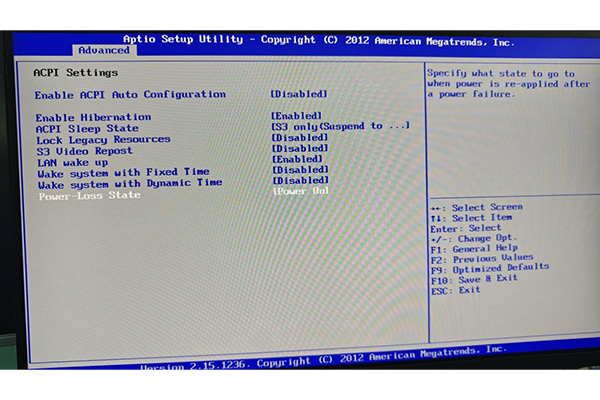
4, press the "Enter" key, then press the "F10" key to save, such as the machine boot into the system and then shut down, the call from the start of the setting is completed£º
Chapter 2 Timed startup
1. Press the "DEL" key to enter the BIOS, as shown in the following figure:
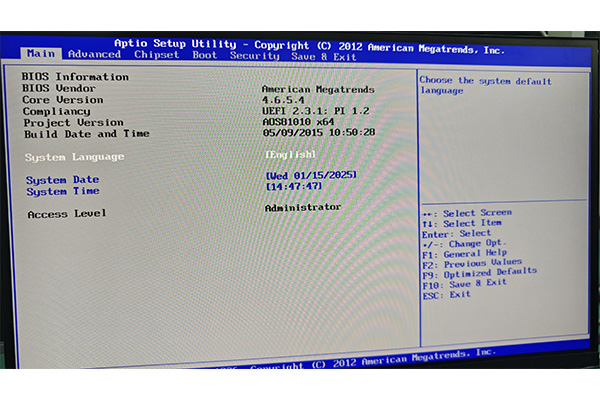
2¡¢ Choose Advanced---->ACPI Settings, as shown in the following figure: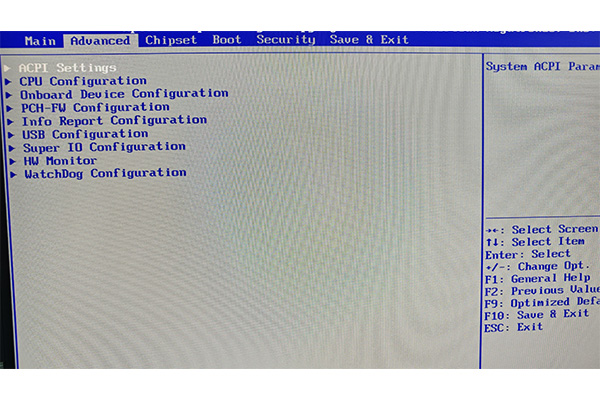
3¡¢Press Enter to access the options, and find Wake sys tem with Fixed Time---->Enabled, as shown in the following figure: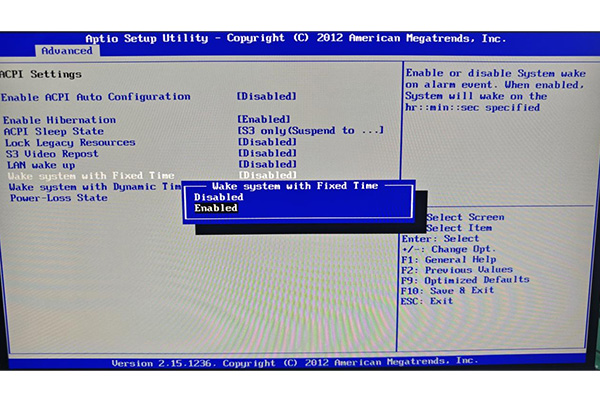
4¡¢If it is set at 10:10 every day, as shown in the picture below: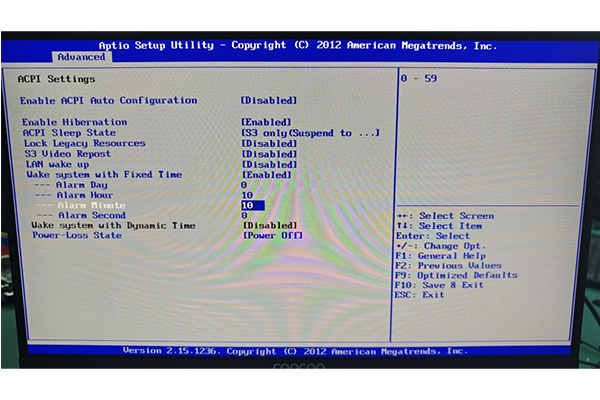 ALarm Day: Every day
ALarm Hour: indicates the hour
ALarm Minute: indicates the minute
ALarm Second: indicates the second
5, press the "Enter" key, then press the "F10" key to save, wait for the machine to start into the system and then shut down, timed boot setting is completed (note: in the BIOS time shall be subject to, after the setting can not power off)
Chapter 1 Power-on Self-starting
1¡¢Press DEL to enter the BIOS, as shown in the following figure: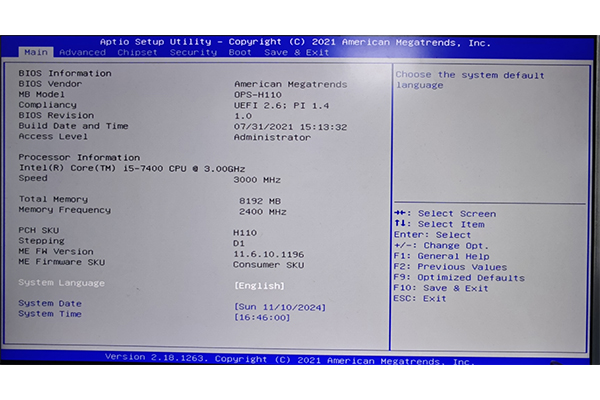
2¡¢Choose Advanced---->IT8772E Super IO Configuration, as shown in the following figure: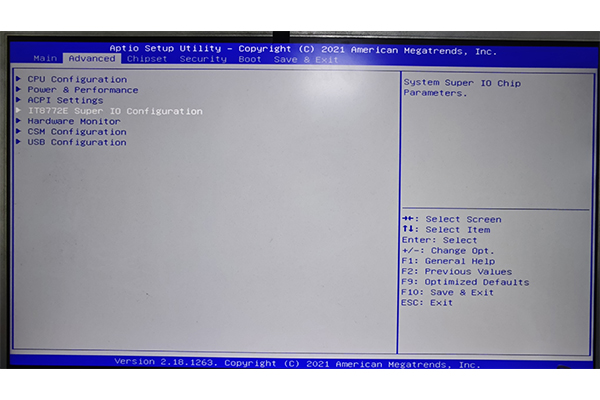
3¡¢Press Enter to enter the option, and find Restore AC Power Loss-- >Power on, as shown in the following figure: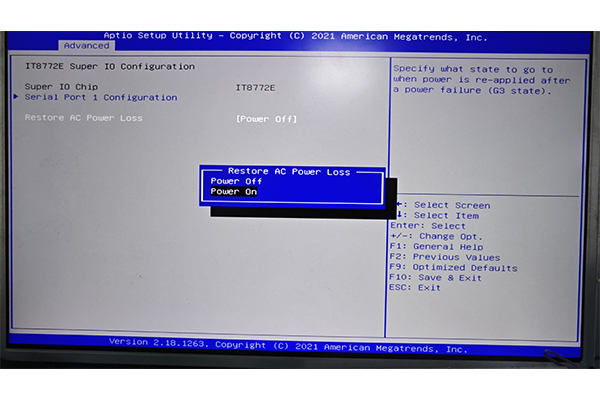
4¡¢Press the "Enter" key, then press the "F10" key to save, and then shut down the machine after it is started into the system
Chapter 2 Timed startup
1¡¢Press DEL to enter the BIOS, as shown in the following figure: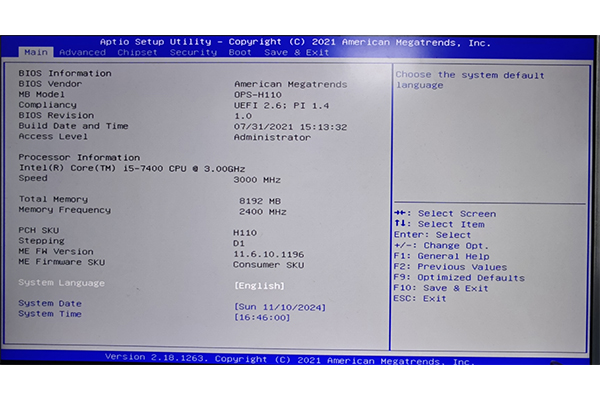
2¡¢Select "Advanced---->APCI Settings", the third option as shown in the image below: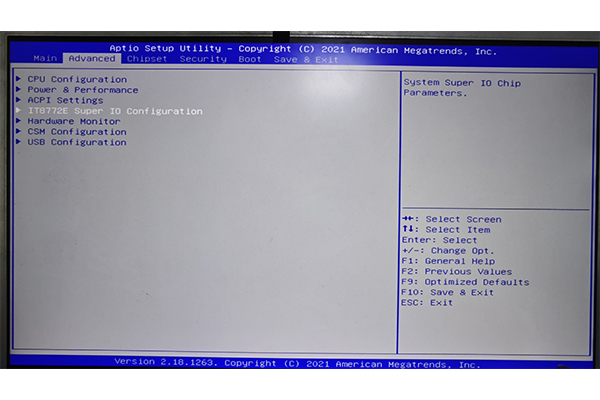
3¡¢After entering, select Wake System from S5 -->enabled, as shown in the following figure: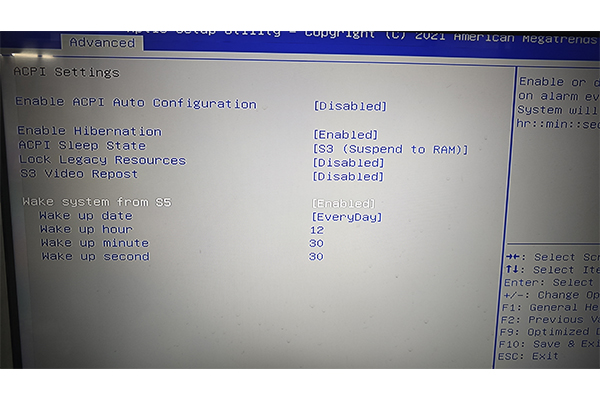
4¡¢If the setting is 9:40 every day, as shown below: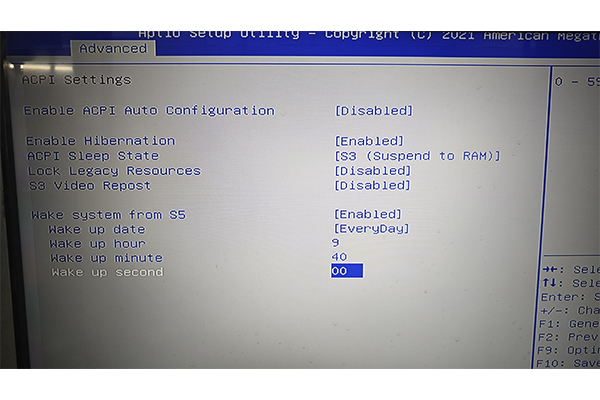 Wake up date: : Every day
Wake up hour: indicates the hour
Wake up minute: indicates the minute
Wake up second: indicates second
5, press the "Enter" key, then press the "F10" key to save, and wait for the machine to start into the system and then shut down, timed boot setting is completed (note: can not power off during the process)
Chapter 1 Power-on Self-starting
1¡¢Press DEL to enter the BIOS, as shown in the following figure: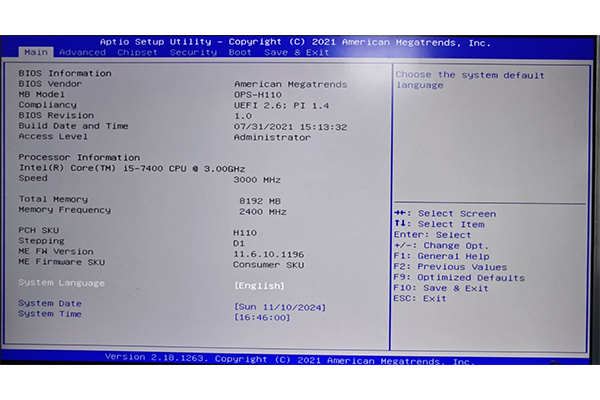
2¡¢Choose Advanced---->IT8772E Super IO Configuration, as shown in the following figure: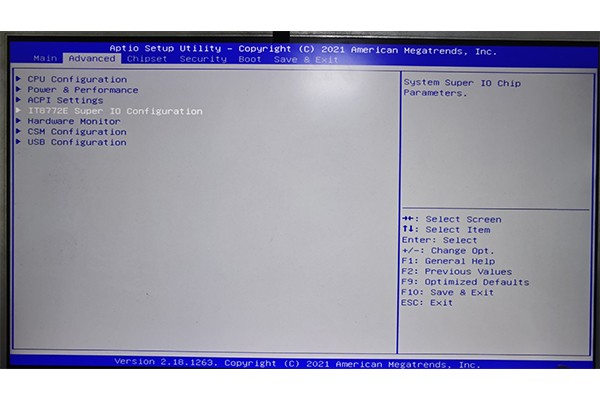
3¡¢Press Enter to enter the option, and find Restore AC Power Loss-- >Power on, as shown in the following figure: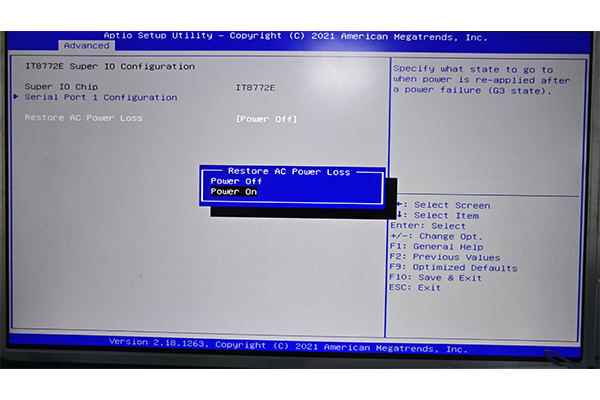
4¡¢Press the "Enter" key, then press the "F10" key to save, and then shut down the machine after it is started into the system
Chapter 2 Timed startup
1¡¢Press DEL to enter the BIOS, as shown in the following figure: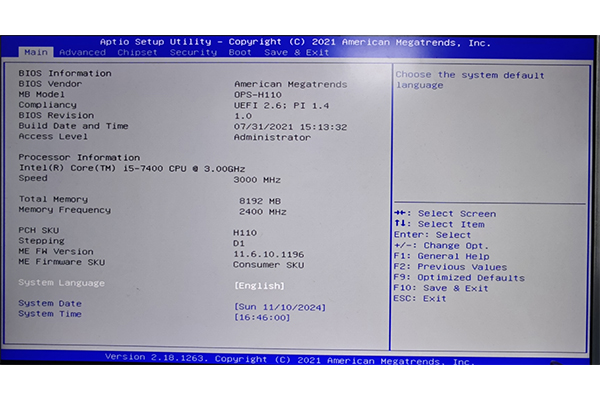
2¡¢Select "Advanced---->APCI Settings", the third option as shown in the image below: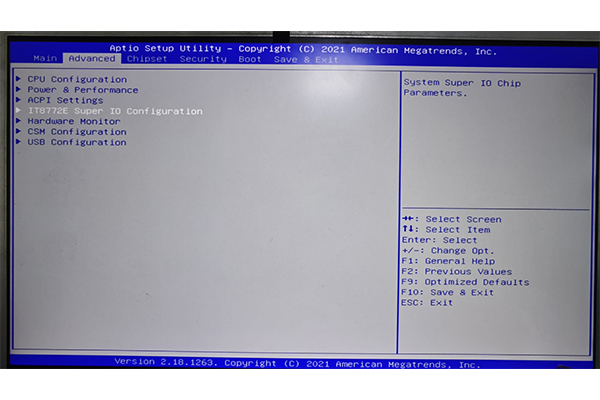
3¡¢After entering, select Wake System from S5 -->enabled, as shown in the following figure: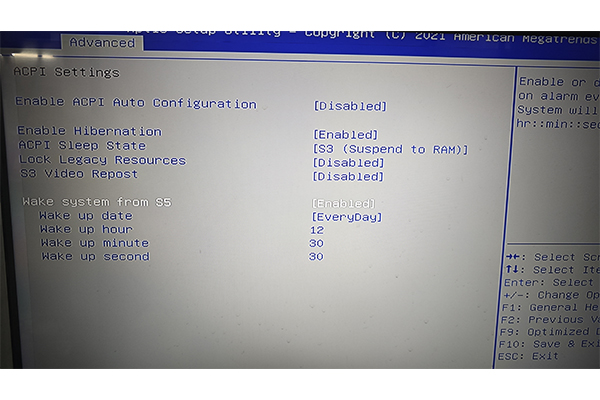
4¡¢If the setting is 9:40 every day, as shown below: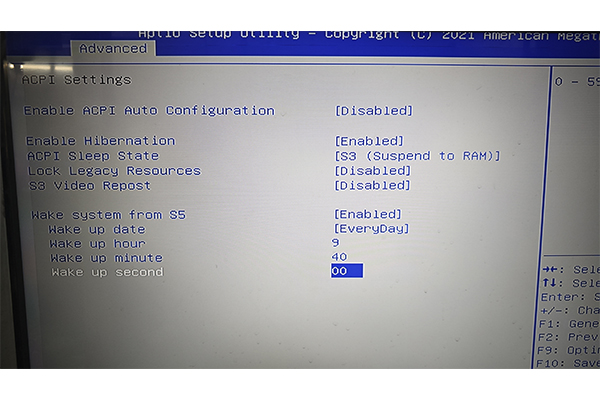 Wake up date: : Every day
Wake up hour: indicates the hour
Wake up minute: indicates the minute
Wake up second: indicates second
5, press the "Enter" key, then press the "F10" key to save, and wait for the machine to start into the system and then shut down, timed boot setting is completed (note: can not power off during the process)
Chapter 1 Power-on Self-starting
1¡¢Press DEL to enter the BIOS, as shown in the following figure: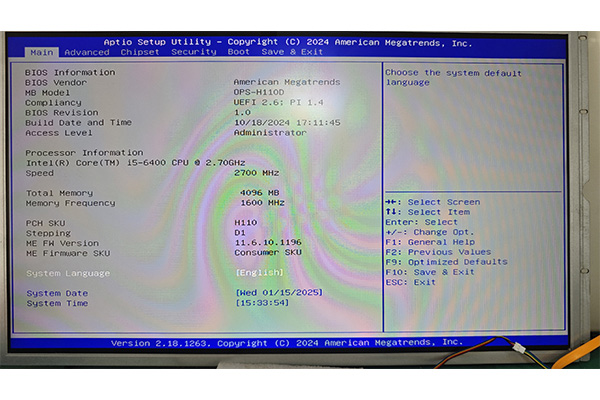
2¡¢Choose Advanced---->IT8784E Super IO Configuration, as shown in the following figure: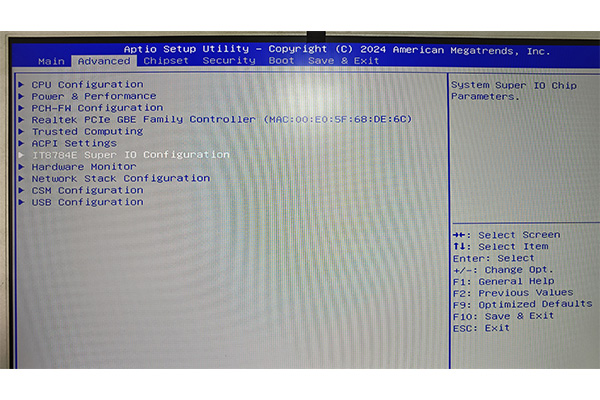
3¡¢Press Enter to enter the option, and find Restore AC Power Loss-- >Power on, as shown in the following figure: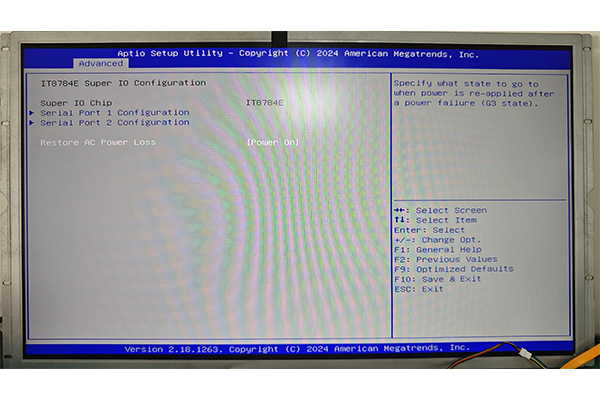
4¡¢Press the "Enter" key, then press the "F10" key to save, and then shut down the machine after it is started into the system
Chapter 2 Timed startup
1¡¢Press DEL to enter the BIOS, as shown in the following figure: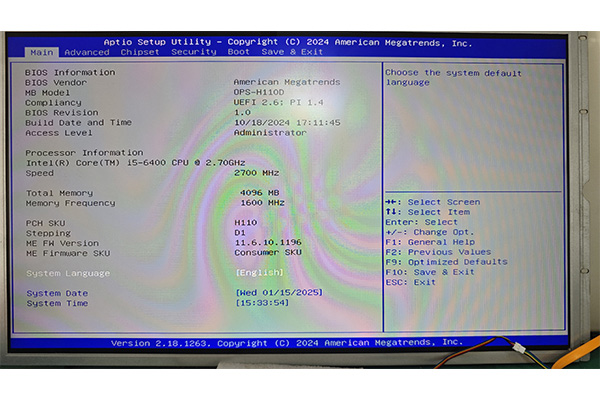
2¡¢Select "Advanced-->ACPI Settings", as shown in the following picture:
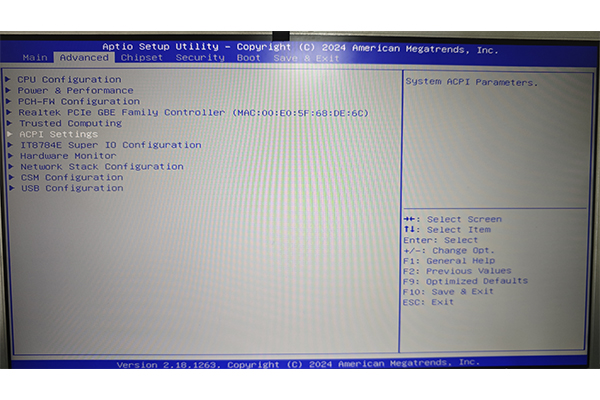
3¡¢After entering, select "Wake System from S5 -->enabled", as shown in the following figure: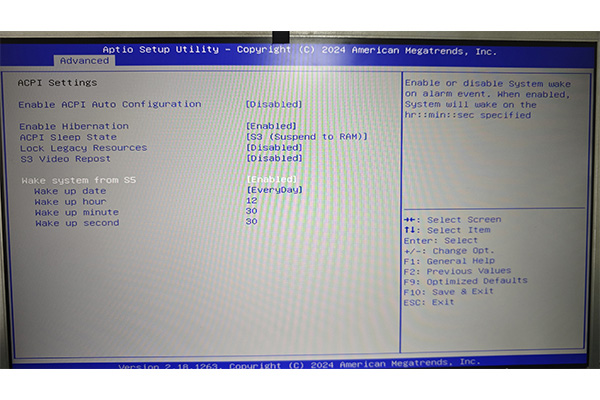
4¡¢if the setting is 11:25 every day, as shown in the following picture: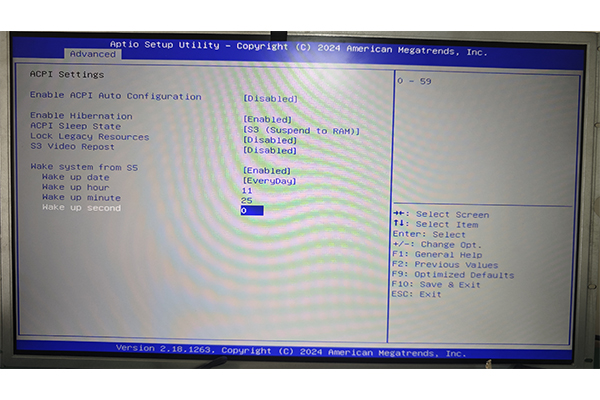 Wake up date: : Every day
Wake up hour: indicates the hour
Wake up minute: indicates the minute
Wake up second: indicates second
4, press the "Enter" key, and then press the "F10" key to save, and wait for the machine to start into the system and then shut down, timed boot setting is completed (note: the time in the BIOS shall be subject to the setting, can not power off after the completion of the setting)
Chapter 1 Power-on Self-starting
1¡¢Press DEL to enter the BIOS main screen, as shown in the following figure: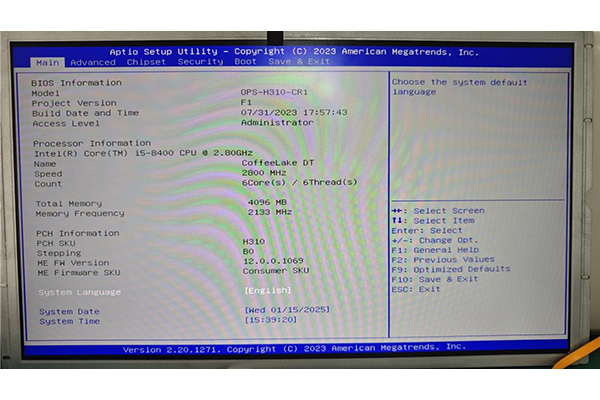
2¡¢Select Advanced-- >IT8784E Super IO Configuration, as shown in the following figure:
3¡¢After entering the menu, select the option "Restore AC Power Loss-- >Power on". After the setting is complete, the following picture is shown:
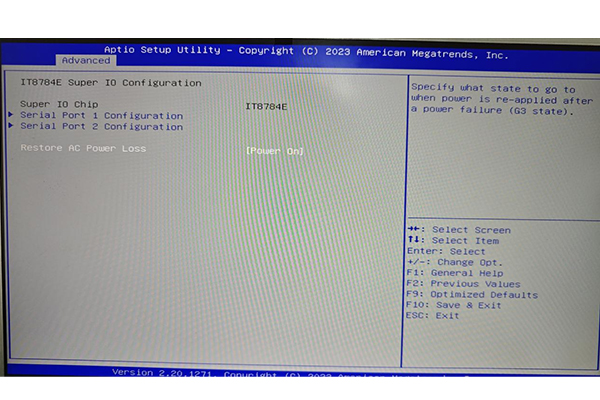
4¡¢Press F10 to save the Settings. After the machine starts up normally and enters the system, the setup is complete.
Chapter 2 Timed startup
1¡¢Press DEL to enter the BIOS main screen, as shown in the following figure: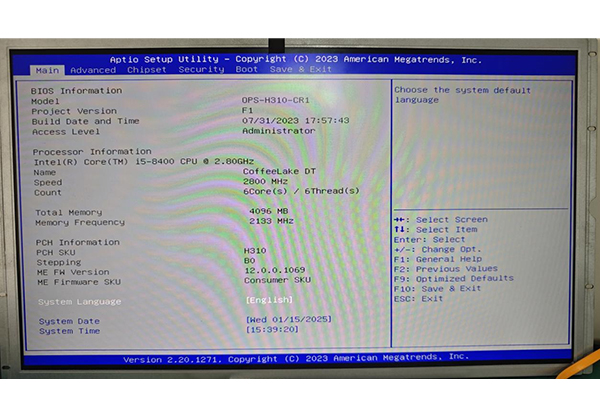
2¡¢Select "Advanced-->ACPI Settings", as shown in the following picture: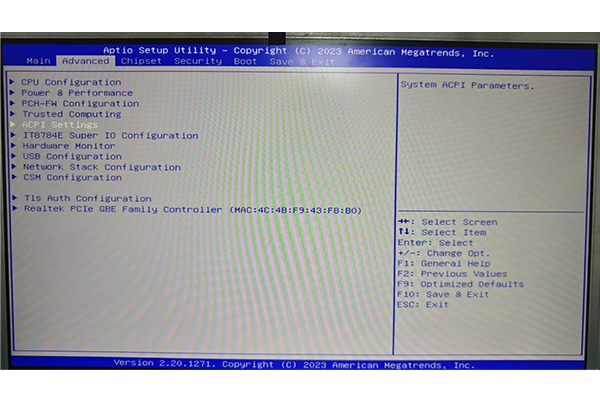
3¡¢After entering, select "Wake System from S5 -->enabled", as shown in the following figure: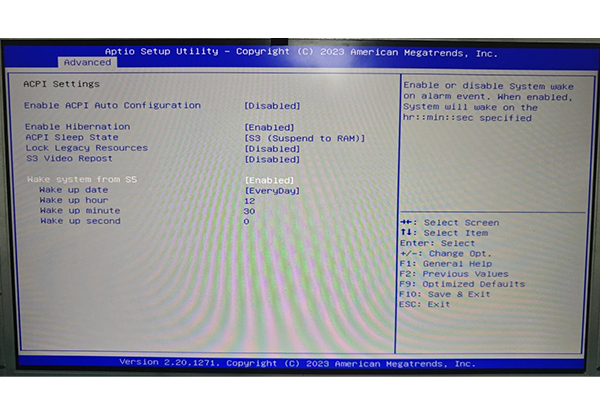
Suppose it is set to 6:19 p.m. every day, as shown below: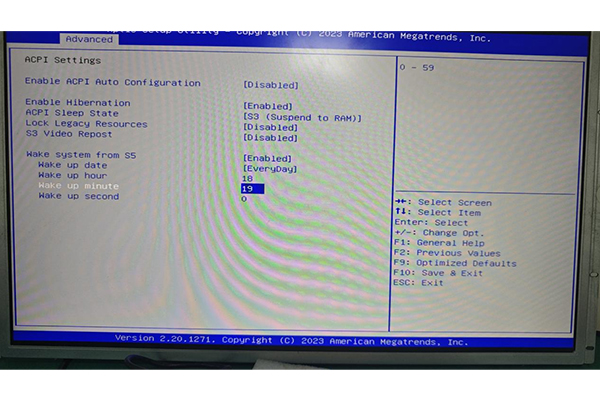
Wake up date: : Every day
Wake up hour: indicates the hour
Wake up minute: indicates the minute
Wake up second: indicates second
5, press the "Enter" key, and then press the "F10" key to save, wait for the machine to boot into the system and then shut down, timed boot setting is completed (note: the time in the BIOS shall be subject to the setting, can not power off after the completion of the setting)
Chapter 1 Power-on Self-starting
1¡¢Press DEL to enter the BIOS main screen, as shown in the following figure: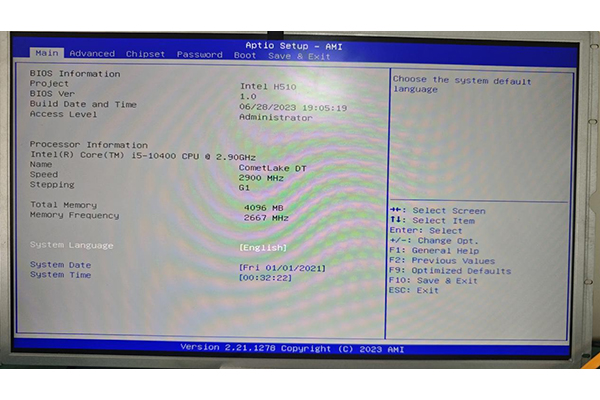
2¡¢Select Advanced-- >Super IO Configuration, as shown in the following figure: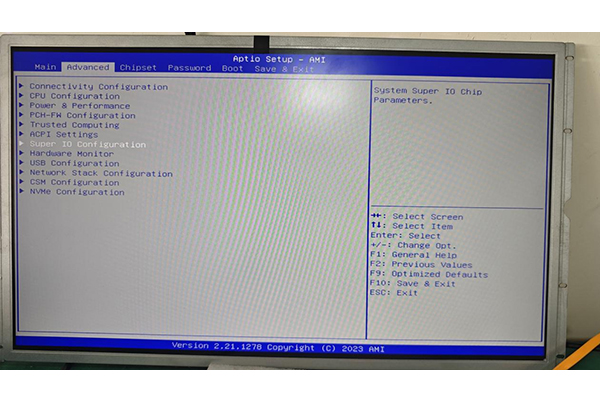
3¡¢After entering the menu, select the option "Restore AC Power Loss-- >Power on". After the setting is complete, the following picture is shown:
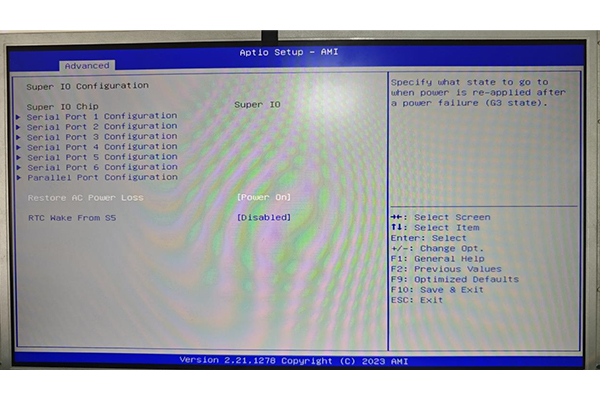
4¡¢Press F10 to save the Settings. After the machine starts up normally and enters the system, the setup is complete.
Chapter 2 Timed startup
1¡¢Press DEL to enter the BIOS main screen, as shown in the following figure: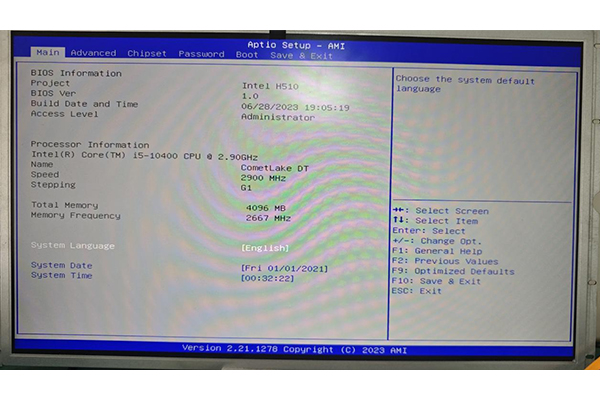
2¡¢Select Advanced-- >Super IO Configuration, as shown in the following figure:
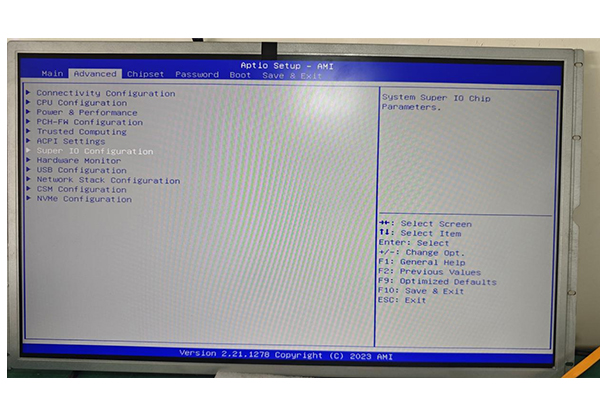
3¡¢After the login, choose RTC Wake From S5---->Enabled, as shown in the following figure: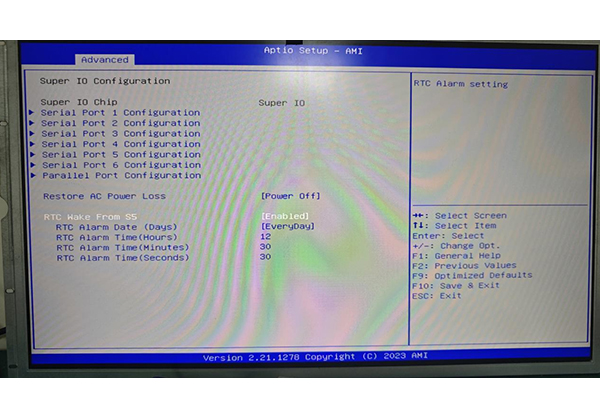
If it is set every day after 7:9 PM, it is as follows: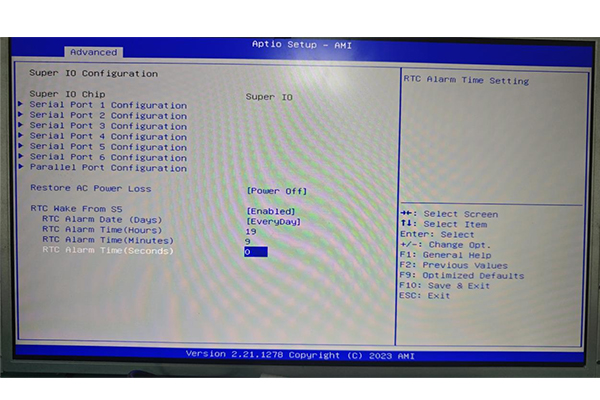 RTC Alarm Date (Days): Every day
RTC Alarm Time (Hours) : indicates the hours
RTC Alarm Time (Minutes) : indicates minutes
RTC Alarm Time (Seconds) : indicates seconds
5, press the "Enter" key, and then press the "F10" key to save, wait for the machine to boot into the system and then shut down, timed boot setting is completed (note: the time in the BIOS shall be subject to the setting, can not power off after the completion of the setting)
Chapter 1 Power-on Self-starting
1¡¢Press DEL to enter the BIOS main screen, as shown in the following figure: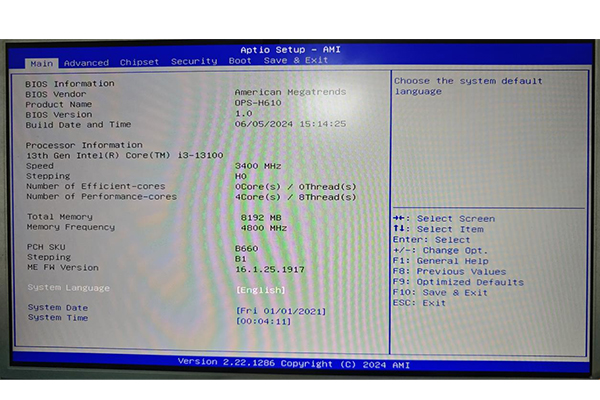
2¡¢Select "Advanced-- >Miscellaneous Configuration", as shown in the picture below: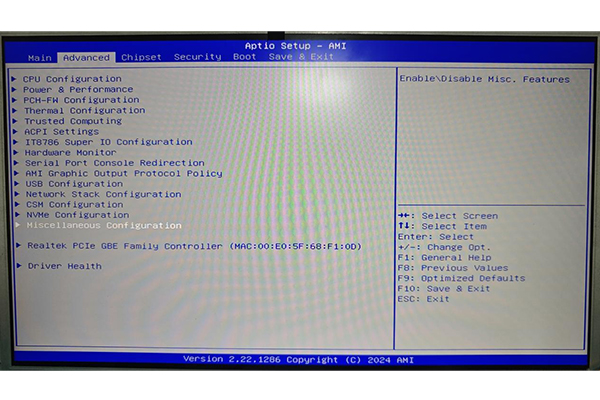
3¡¢After entering the menu, select the option "Restore AC Power Loss-- >Power on". After the setting is complete, the following picture is shown: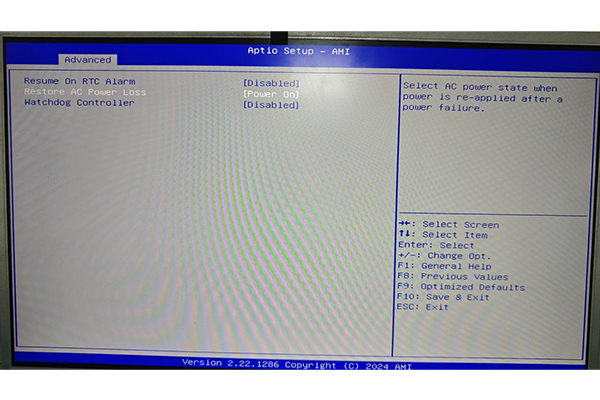
4¡¢Press F10 to save the Settings. After the machine starts up normally and enters the system, the setup is complete.
Chapter 2 Timed startup
1¡¢Press DEL to enter the BIOS main screen, as shown in the following figure:
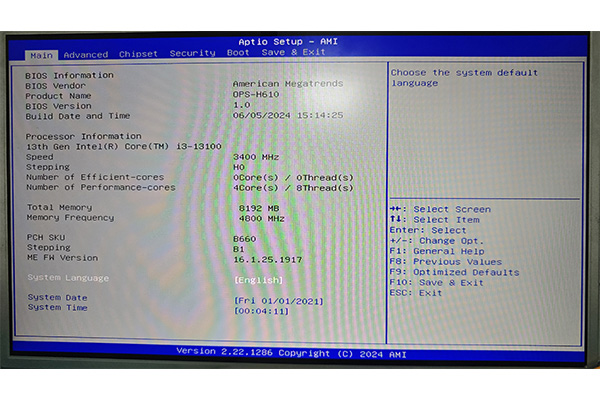
2¡¢Select "Advanced-- >Miscellaneous Configuration", as shown in the picture below:

3¡¢After entering the options, select Resume On RTC Alarm-- >Enabled, as shown in the following figure:
4¡¢If the setting is 15:18 every day, as shown in the figure below: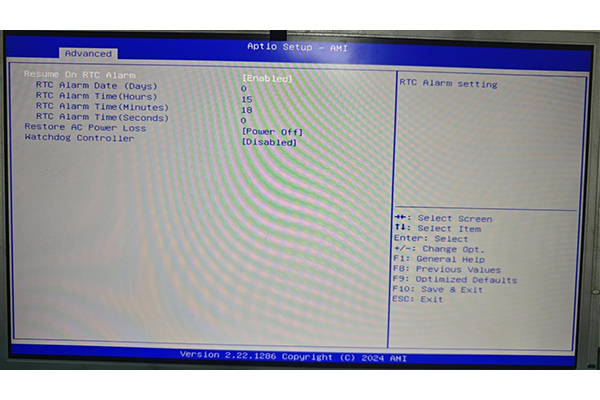 RTC Alarm Date (Days): Every day
RTC Alarm Time (Hours) : indicates the hours
RTC Alarm Time (Minutes) : indicates minutes
RTC Alarm Time (Seconds) : indicates seconds
5, press the "Enter" key, and then press the "F10" key to save, wait for the machine to boot into the system and then shut down, timed boot setting is completed (note: the time in the BIOS shall be subject to the setting, can not power off after the completion of the setting)
Chapter 1 Power-on Self-starting
1¡¢Press DEL to enter the BIOS main screen, as shown in the following figure: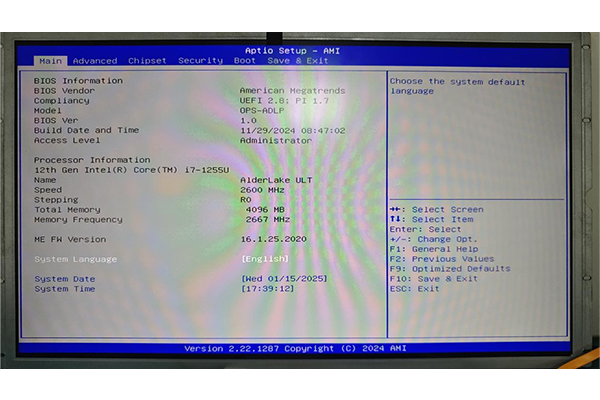
2¡¢Select "Advanced-- >IT8786 Super IO Configuration", as shown in the following figure: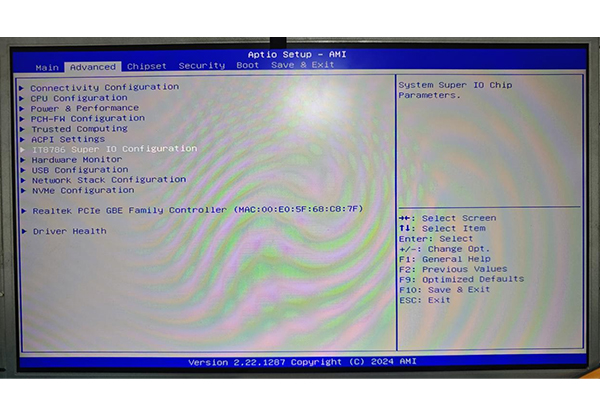
3¡¢After entering the menu, select the option "Restore AC Power Loss-- >Power on". After the setting is complete, the following picture is shown:
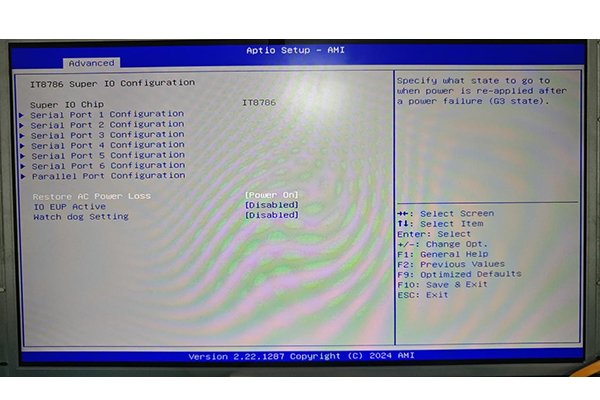
4¡¢Press F10 to save the Settings. After the machine starts up normally and enters the system, the setup is complete.
Chapter 2 Timed startup
1¡¢Press DEL to enter the BIOS main screen, as shown in the following figure:
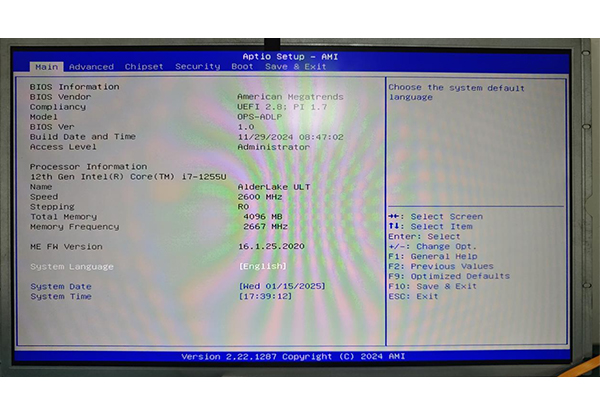
2¡¢Select "Advanced-->ACPI Settings", as shown in the following picture: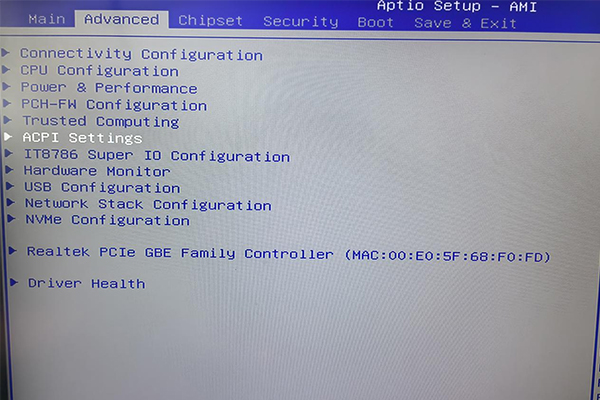
3¡¢After entering, select "Wake System from S5 -->enabled", as shown in the following figure: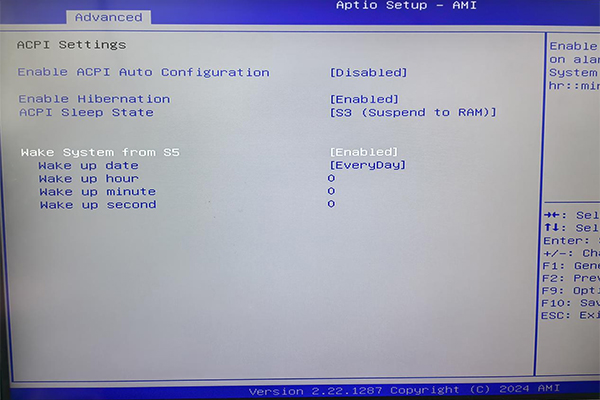
4¡¢If the setting is 9:28 every day, as shown below: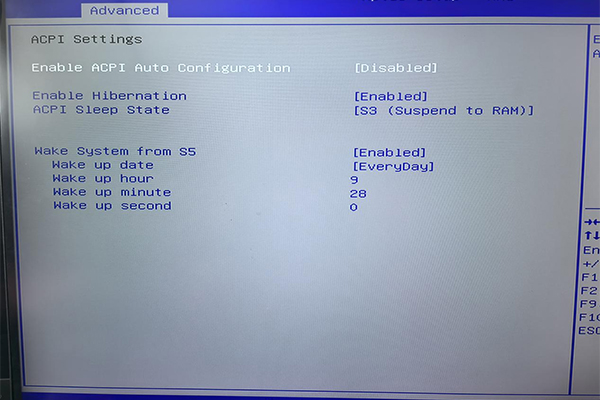 Wake up date: : Every day
Wake up hour: indicates the hour
Wake up minute: indicates the minute
Wake up second: indicates second
5, press the "Enter" key, and then press the "F10" key to save, wait for the machine to boot into the system and then shut down, timed boot setting is completed (note: the time in the BIOS shall be subject to the setting, can not power off after the completion of the setting)
Chapter 1 Power-on Self-starting
1¡¢Press DEL to enter the BIOS main screen, as shown in the following figure: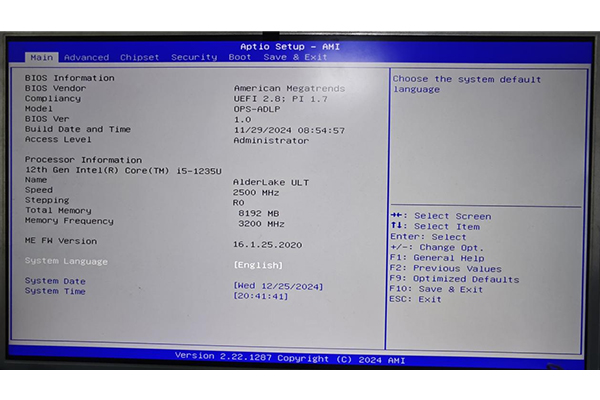
2¡¢Select "Advanced-- >IT8786 Super IO Configuration", as shown in the following figure: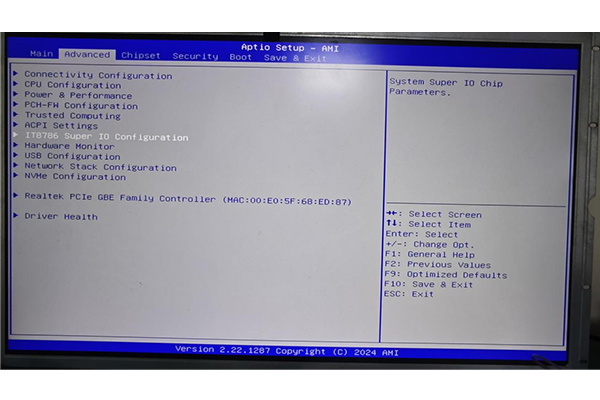
3¡¢After entering the menu, select the option "Restore AC Power Loss-- >Power on", as shown in the following picture: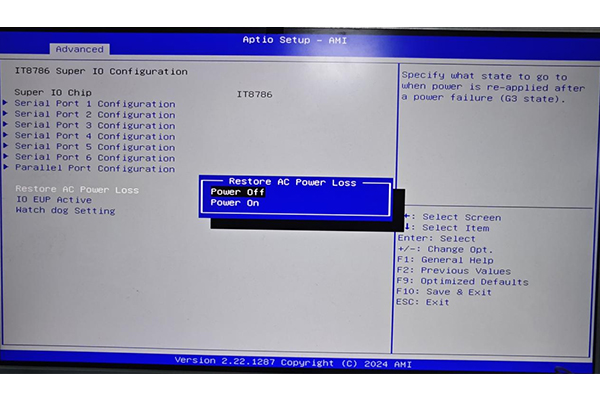
4¡¢After the setting is complete, as shown in the following figure: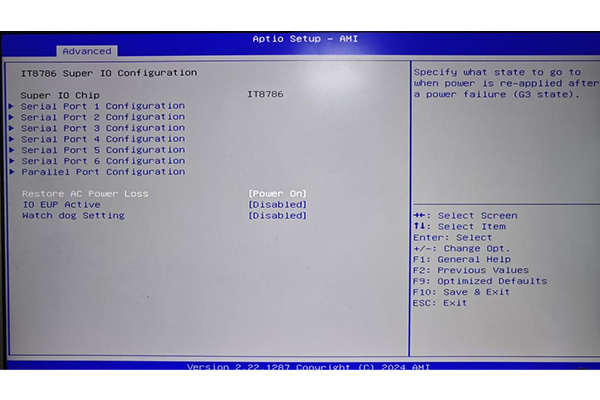
5¡¢Press F10 to save the Settings. After the machine starts up normally and enters the system, the setup is complete.
Chapter 2 Power-on self-starting
1¡¢Press DEL to enter the BIOS main screen, as shown in the following figure:
2¡¢Select "Advanced-->ACPI Settings", as shown in the following picture:
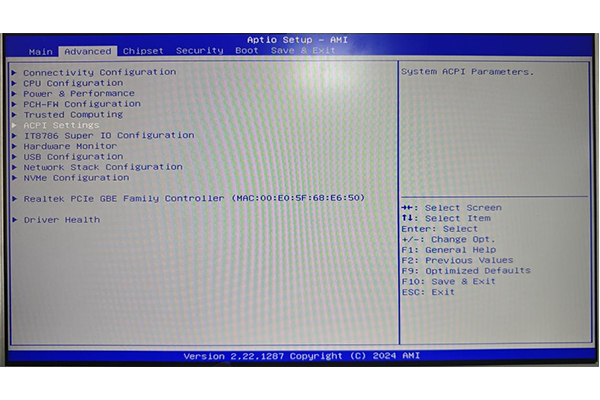
3¡¢After entering, select "Wake System from S5 -->enabled", as shown in the following figure: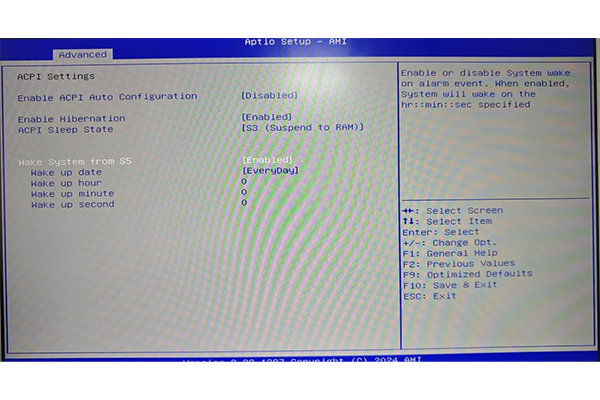
If the setting is 11:49 every day, as shown in the figure below: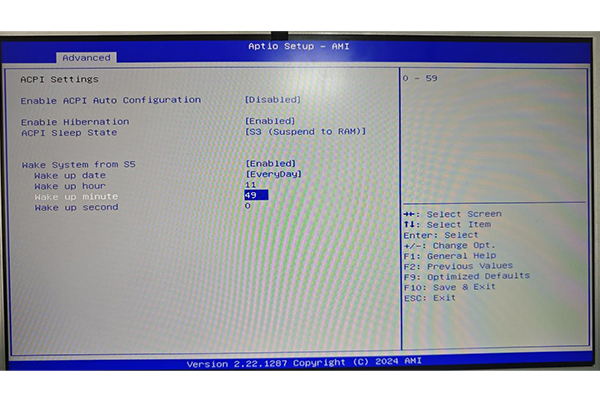 .Wake up date: : Every day
Wake up hour: indicates the hour
Wake up minute: indicates the minute
Wake up second: indicates second
5, press the "Enter" key, and then press the "F10" key to save, wait for the machine to boot into the system and then shut down, timed boot setting is completed (note: the time in the BIOS shall be subject to the setting, can not power off after the completion of the setting)
Chapter 1 Power-on Self-starting
1¡¢Press DEL to enter the BIOS main screen, as shown in the following figure: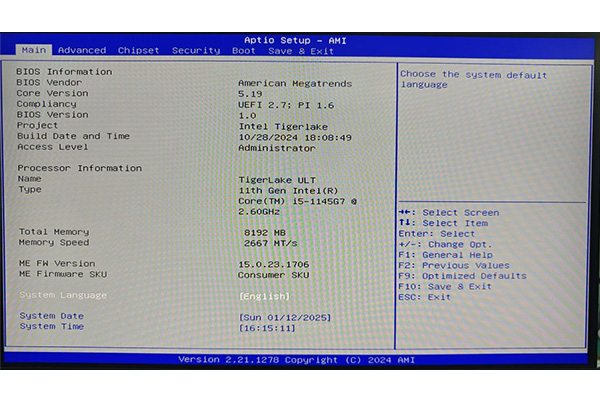
2¡¢Select Advanced-- > Super IO Configuration, as shown in the following figure: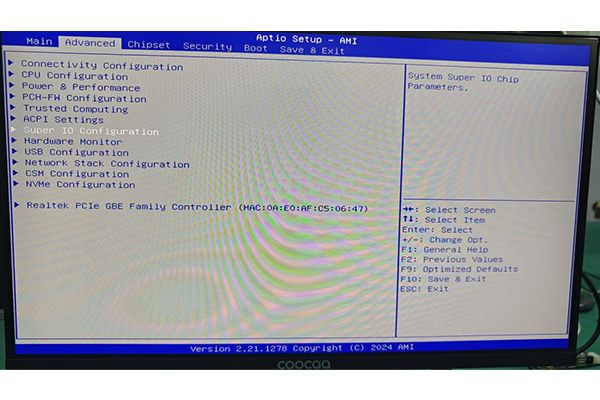
3¡¢After entering the menu, select the option "Restore AC Power Loss-- >Power on". After the setting is complete, the following picture is shown:
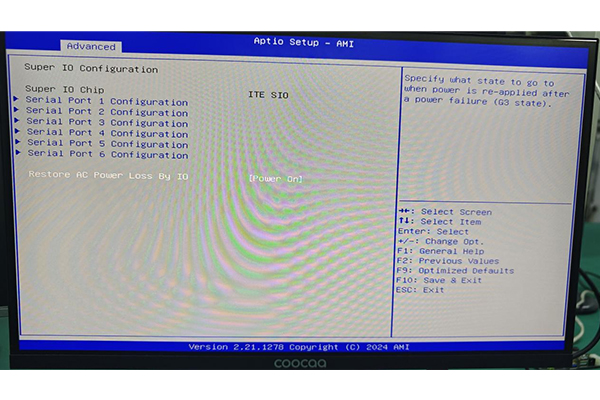
4¡¢Press F10 to save the Settings. After the machine starts up normally and enters the system, the setup is complete.
Chapter 2 Timed startup
1¡¢Press DEL to enter the BIOS main screen, as shown in the following figure: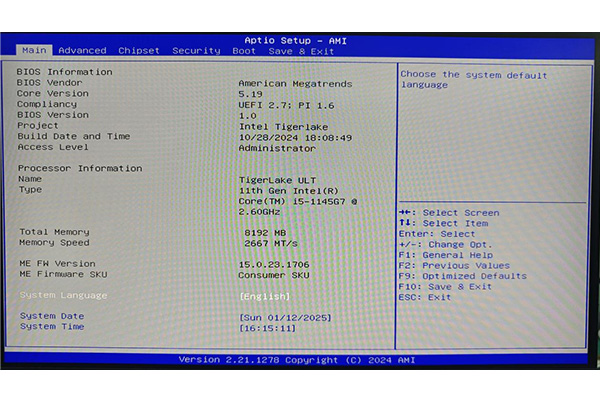
2¡¢Select "Advanced-->ACPI Settings", as shown in the following picture: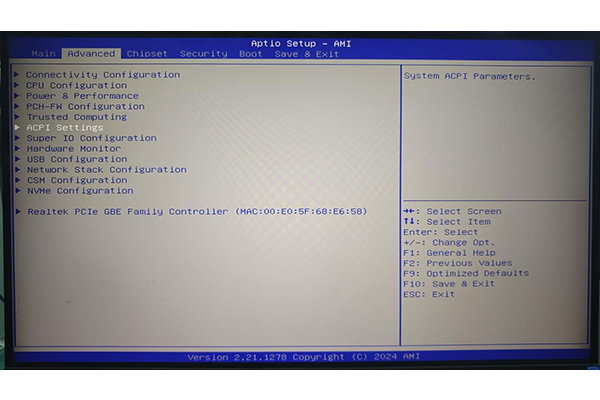
3¡¢After entering, select "Wake System from S5 -->enabled", as shown in the following figure: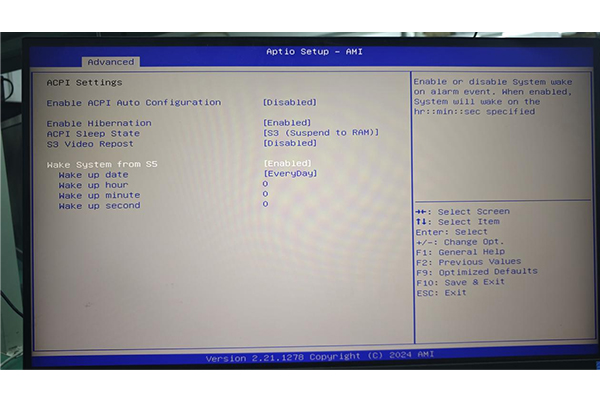
If the setting is 9:30 every day, as shown in the following picture: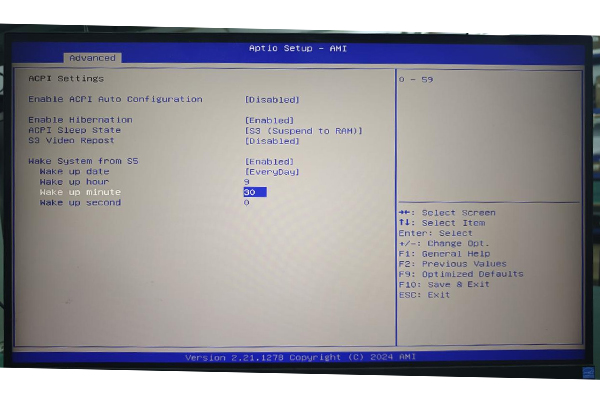
Wake up date: : Every day
Wake up hour: indicates the hour
Wake up minute: indicates the minute
Wake up second: indicates second
5, press the "Enter" key, and then press the "F10" key to save, wait for the machine to boot into the system and then shut down, timed boot setting is completed (note: the time in the BIOS shall be subject to the setting, can not power off after the completion of the setting)
Chapter 1 Power-on Self-starting
1¡¢Press DEL to enter the BIOS main screen, as shown in the following figure:
2¡¢Select Advanced-- >IT8613 Super IO Configuration, as shown in the following figure: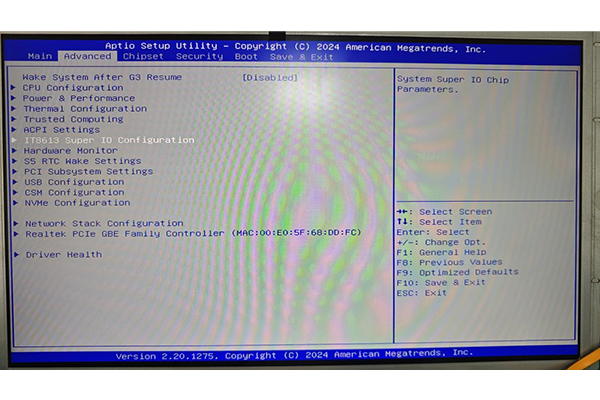
3¡¢After entering the menu, select the option "Restore AC Power Loss-- >Power on". After the setting is complete, the following picture is shown: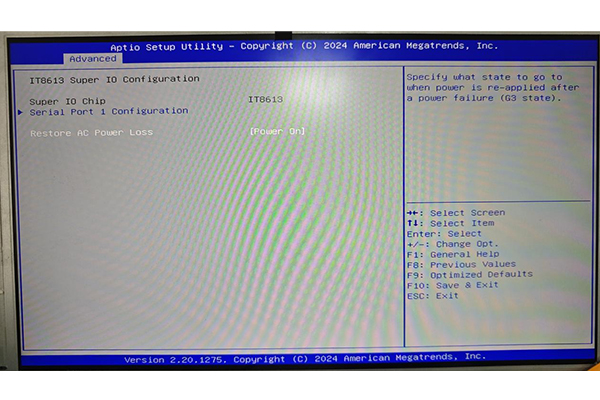
4¡¢Press F10 to save the Settings. After the machine starts up normally and enters the system, the setup is complete.
Chapter 2 Timed startup
1¡¢Press DEL to enter the BIOS main screen, as shown in the following figure: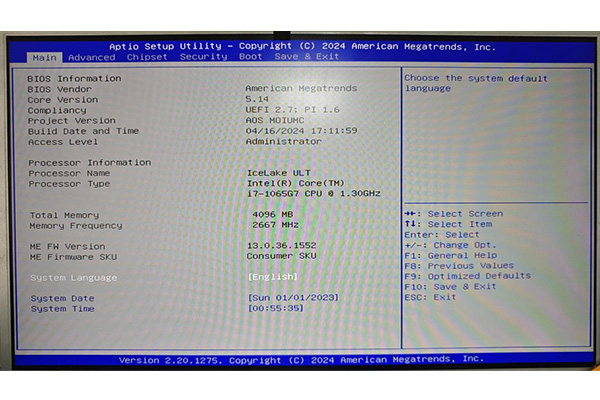
2¡¢Select "Advanced-- >S5 RTC Wake Settings", as shown in the picture below: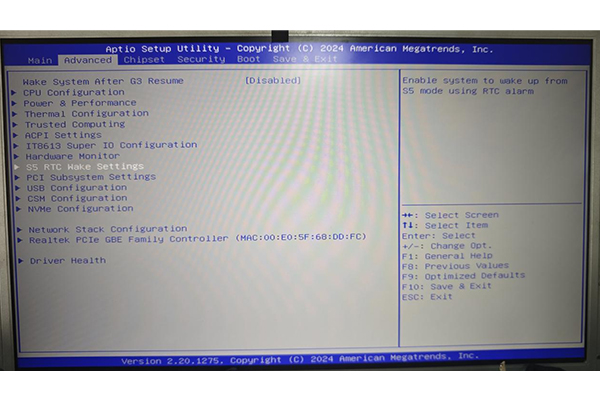
3¡¢After logging in, select Wake System from S5-- >Fixed Time, as shown below:

4¡¢If the setting is 11 o 'clock every day, as shown below: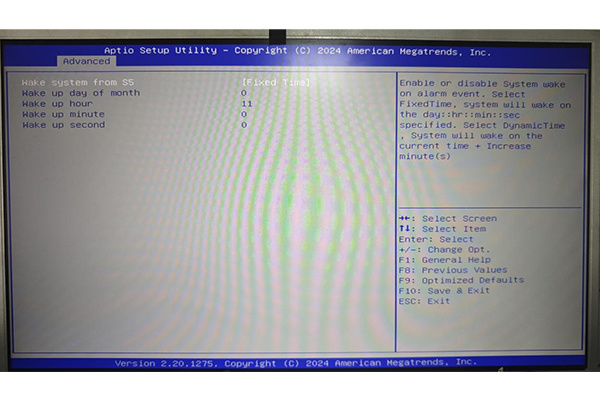 Wake up date: : Every day
Wake up hour: indicates the hour
Wake up minute: indicates the minute
Wake up second: indicates second
5, press the "Enter" key, and then press the "F10" key to save, wait for the machine to boot into the system and then shut down, timed boot setting is completed (note: the time in the BIOS shall be subject to the setting, can not power off after the completion of the setting)
Copyright @2020 AIOSTAR All Rights Reserved by „žW